How to make a photo collage online, with no sign-up and without uploading your photos
Putting the best photos of a trip, a party or a product into a single frame usually takes an editing program or an app full of ads. This guide shows how to build the collage in your browser: drop the photos, pick a theme or an arrangement, change the background and download as PNG, JPG, WebP, in several sizes at once or as a video.
Guide written by Marcelo Amantino · updated on November 4, 2026 · about us
Where your data is processed
Photos are read and drawn by your own browser: nothing is sent to WebFaz. The only download is Google’s public AI model that finds faces (about 8 MB), once, and no photo is uploaded. The collage in progress and the designs you save stay in this browser, on your device; to take a collage elsewhere, download the file. In practice, family and work photos do not go through an unknown service just to become a nice frame.
See the full list on the Privacy page.
Real-world use cases
Build a collage with the photos of a weekend trip
Situation: You have five good photos from a weekend and want a single frame to post.
- Open Collage and choose or drop the photos in the middle area (up to 60).
- See the collage already built and, if you want another look, click “Random style”.
- Click a photo to see its bar. “Frame” moves the tile; “Content” adjusts the photo inside the tile (a click on the selected photo toggles it).
- In the “Photos” tab, drag a thumbnail to change the order, or drop it on a tile to swap that tile’s photo.
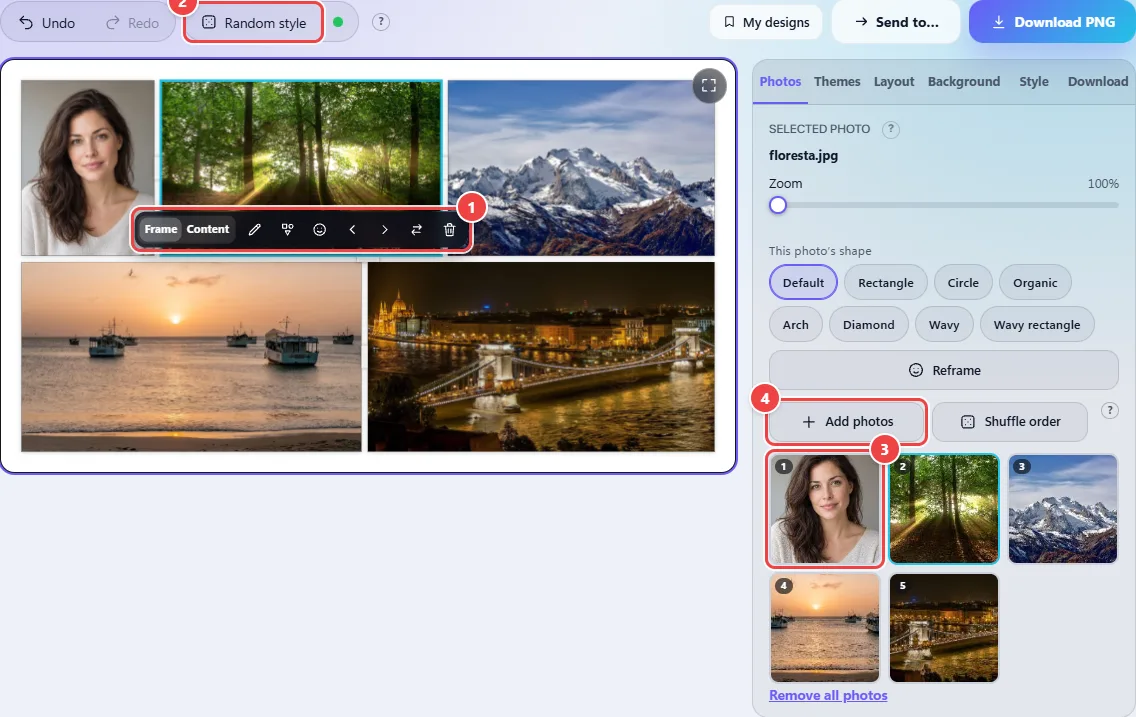
- Point 1: The photo bar: Frame or Content (what dragging moves), edit in Studio, a shape for this photo only, reframe by face, swap places and delete.
- Point 2: Rolls a new look (arrangement, background, frame and decorations). The app already does it once when the photos arrive, so you can see how it works.
- Point 3: Thumbnails follow the photo order. Drag one to change the order or drop it on a tile to swap that tile’s photo.
- Point 4: You can add more photos at any time: the collage rebuilds itself.
Result: An arranged collage, with the photos in the order and framing you chose.
Scatter the photos like on a table, hiding no one
Situation: You want a loose look, with rotated and overlapping photos, but there are people in the photos and nobody can be left out.
- Open the “Layout” tab and choose the format (for example, Landscape 16:9 or Story 9:16).
- Under “How to arrange the photos”, choose “Scatter”.
- Adjust the photo size, the overlap and the tilt.
- Click “Shuffle” until you like the distribution.
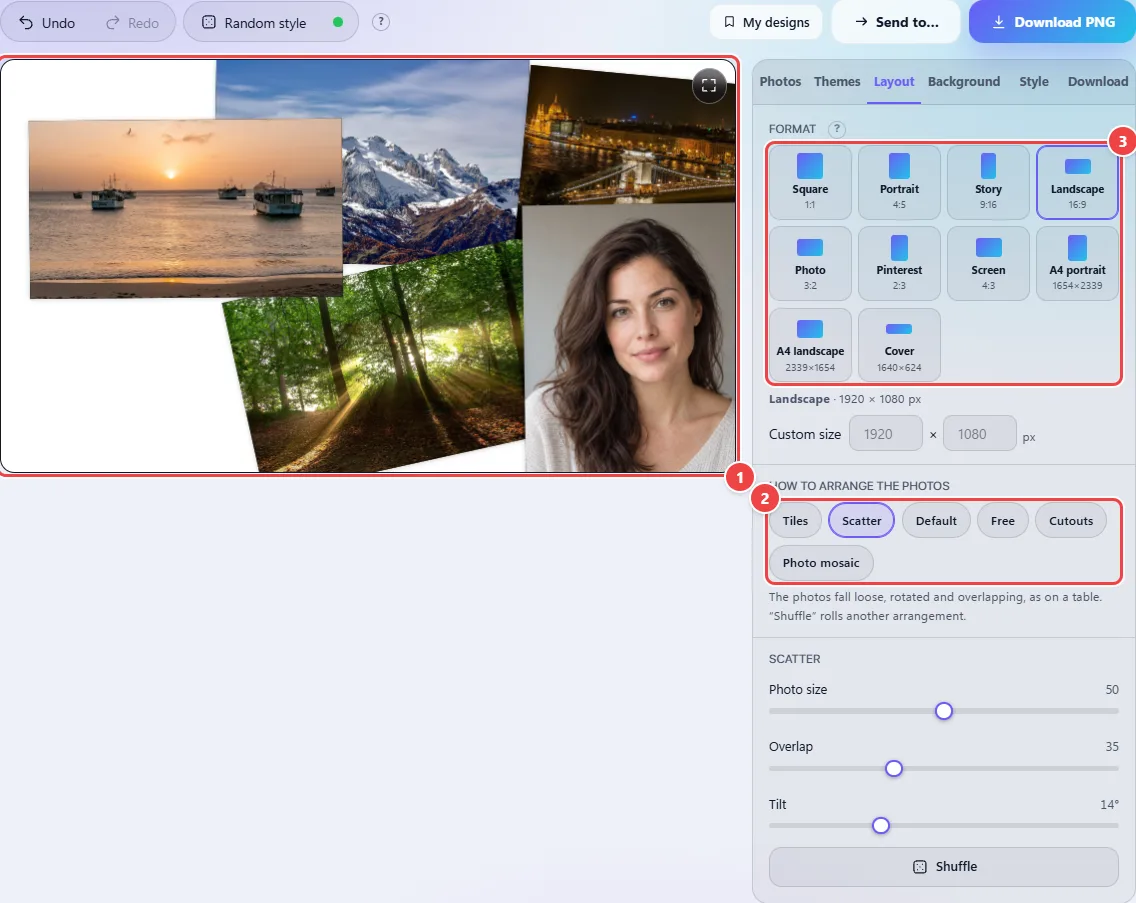
- Point 1: Photos can overlap and hang a little over the edge, but no face leaves the frame or is covered by another photo (the face AI runs on your device).
- Point 2: Tiles, Scatter, Pattern, Free, Cutouts (people cut out like stickers) and Photo mosaic: six ways to arrange the same photos.
- Point 3: The format is the size of the final image: square, portrait, story, landscape, cover and others. The arrangement is redone for each proportion.
Result: Loose, rotated and overlapping photos with every face in view: none is outside the frame or covered by another photo.
Start from a ready-made theme
Situation: You do not want to build from scratch and prefer to pick a nice template.
- Open the “Themes” tab.
- Use the counter to pick how many photos to use and the filters to see only one kind of theme (grid, film, classic, fun…).
- Tap a template: the thumbnail is already your collage with that look.
- Adjust whatever you like on top, in the “Layout”, “Background” and “Style” tabs.
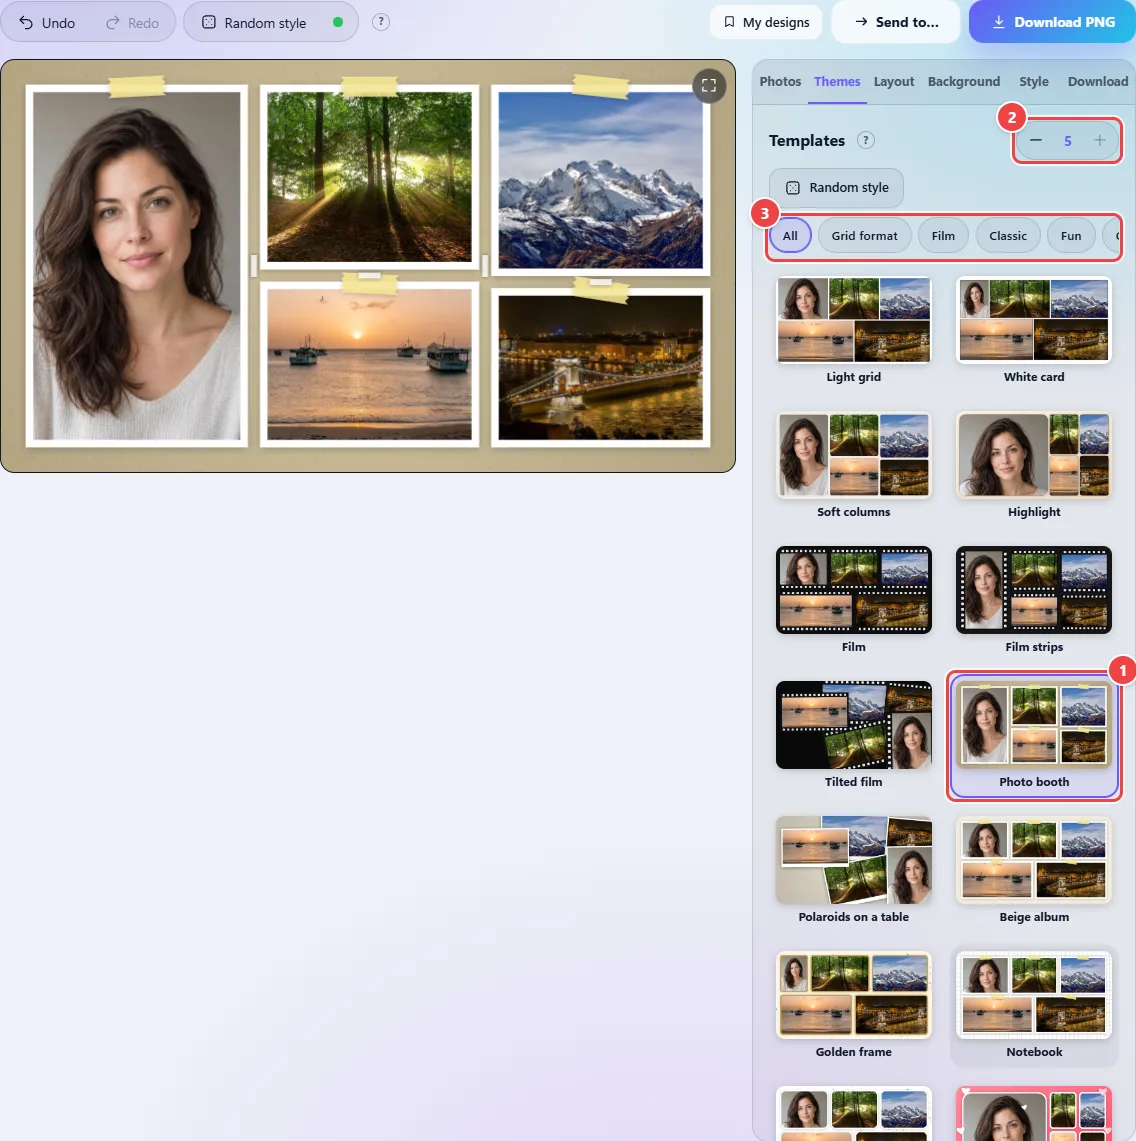
- Point 1: Each thumbnail is your collage with that template (layout, background, frame and decorations). One click applies it; then adjust whatever you like.
- Point 2: Templates adapt to the number of photos: choose how many to use and see only the ones that fit.
- Point 3: Filter by theme type.
Result: Layout, background, frames and decorations applied at once, still fully adjustable.
Swap the background for a watercolor
Situation: The photos look good, but the plain background makes the collage dull.
- Open the “Background” tab.
- Choose “Watercolors” (or “Color blots”): a ready-made background goes behind the photos.
- Click the same button again to swap to another image; the note shows which of the five backgrounds is in use.
- Use “Brightness” to lighten or darken. For a transparent background, choose “Transparent”.
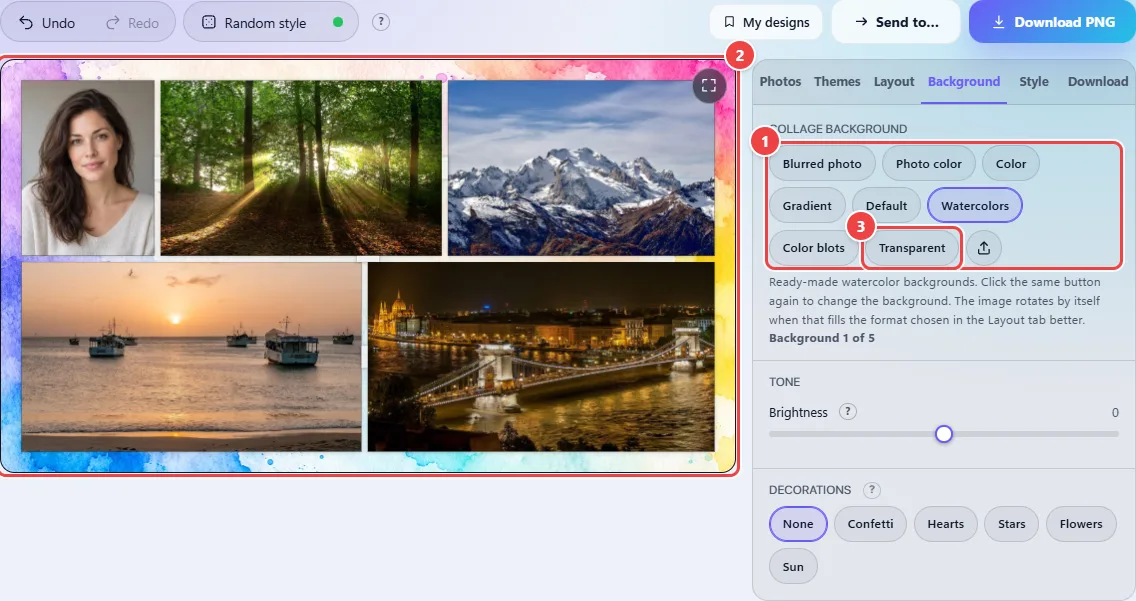
- Point 1: Choose the background type. With Watercolors and Stains, clicking the same button again swaps to another image.
- Point 2: The background rotates itself (0° or 90°) to fill the chosen format better.
- Point 3: A transparent background works too: use PNG or WebP when downloading to keep it.
Result: A collage with a watercolor background that fills the chosen format well, or a transparent background to use elsewhere.
Download for the feed, stories and video
Situation: You need the same collage as square, portrait and story, and also an animated version.
- Open the “Download” tab.
- For a single file, choose PNG, JPG or WebP, the size, and click “Download”.
- Under “Download in several sizes”, tick the formats you want and click “Download … sizes (ZIP)”: the arrangement is redone for each proportion.
- Under “Animated collage”, choose how the photos come in and the time between them and click “Generate and download the video”.
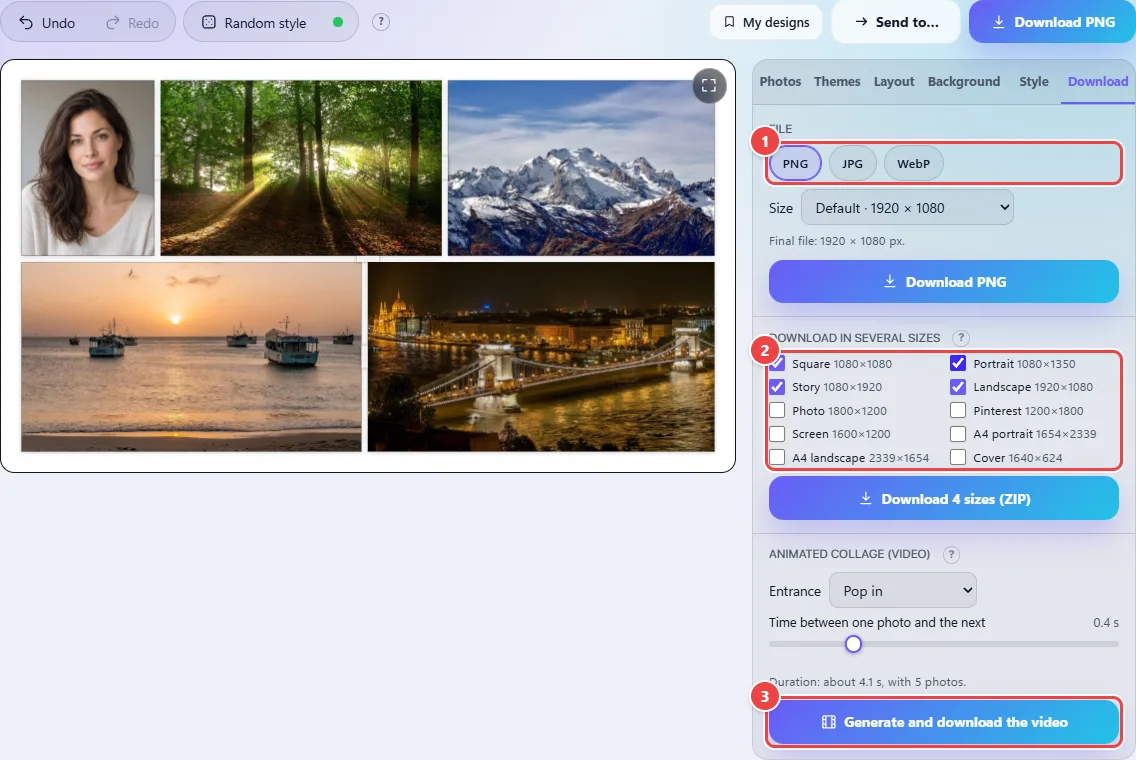
- Point 1: PNG, JPG or WebP. For a transparent background, use PNG or WebP.
- Point 2: Tick several formats to get, in a ZIP, the same collage redone for each proportion (feed, story, cover…).
- Point 3: The animated collage generates a video where the photos come in one after another, to use in the Video Editor or Slideshow.
Result: Files ready for each network, in a ZIP, and a video where the photos come in one after another.
Tips for a better result
- To keep what you made, use “My designs” (up to 12 collages with their photos); “Continue where you left off” reopens the last one from the entry screen.
- If you leave the page (for example, to the Video Editor) and come back with the browser’s back arrow, the collage in progress is still there.
- Click outside the collage to clear the selection and see how it looks, without the bar and the outline.
- With “Send to…”, take the finished collage to Studio, Slideshow or the Video Editor; the Video Editor gets the separate layers, one per photo.
- Before removing all photos the app asks you to confirm; “Undo” reverts most adjustments.
Limits, and when this is not the best option
- Up to 60 photos per collage. Each photo is used as a working version of up to 2,000 pixels on the long side, which is enough for social networks and for A4 at 150 dpi.
- The final file is limited by your device’s pixel budget (about 16 megapixels on iPhone and iPad, 64 on a computer). The app tells you when it scales the size down.
- Face protection applies to Scatter and Cutouts (and to the decorations); if you move a photo by hand in Free mode, the arrangement is yours.
- Cutouts depend on the AI and only cut out photos where it finds a face; the others go in whole. The cutout is not perfect on loose hair or on backgrounds close to skin tone.
- The photo mosaic works best with 20 photos or more, in varied colors. The animated video has no sound and comes out as MP4 (or WebM, depending on the browser).
- Saved designs stay only in this browser: clearing the site data erases everything, and they do not move to another device.
Frequently asked questions
- Are my photos sent to a server?
- No. The collage is built in your browser. The only download is Google’s public AI model that finds faces (about 8 MB), once, and no photo is sent. You can check it in the browser’s Network tab (F12).
- Do I need an account or to pay?
- No. It is free and needs no sign-up.
- How do I save the collage with a transparent background?
- In the Background tab choose Transparent and, in Download, PNG or WebP. The checkerboard in the preview does not go into the file. JPG cannot keep transparency and comes out with a white background.
- Can I use the same collage in several sizes?
- Yes. In Download, tick the formats (square, story, 16:9, A4…) and download the ZIP. The arrangement is redone for each proportion instead of just cropping the image.
- Is my collage saved?
- Only in this browser. “My designs” keeps up to 12 collages with their photos, and “Continue where you left off” reopens the last one. Clearing the site data erases everything.
- How do I edit a photo before putting it in the collage?
- With the pencil icon on the photo bar or on the thumbnail, which opens the photo in Studio. When you save there, it comes back to the same place as a new version. Undo brings the original back, and the compare button shows the before and after.
- Why do some flowers or hearts not show up?
- Decorations move off faces, shrink or, when there is no free space, are not drawn in that corner, so they never cover anyone.