How to make a 3x4 photo online, free and without sending your photo to anyone
A 3x4 photo for a document, resume, badge or registration usually means a trip to a studio or a fight with editing programs. This guide shows how to do everything in your browser: open an ordinary photo (or take one on the spot), check the framing the AI makes from the face, replace the background with white, fix the light and download the photo or the sheet ready to print on 10x15 cm or A4.
Guide written by Marcelo Amantino · updated on November 4, 2026 · about us
Where your data is processed
The photo is opened and edited by your own browser: nothing is sent to WebFaz. The only downloads are Google’s public AI models that find the face and separate the person from the background (about 8 MB), once, and no photo is uploaded. If the AI is turned off or has not downloaded yet, the app uses a simple detection, which is less precise. Nothing is kept after you close the page.
See the full list on the Privacy page.
Real-world use cases
Make the 3x4 photo from a phone photo
Situation: You have a front-facing photo taken at home and need a 3x4 photo for a document.
- Open 3x4 Photo and choose or drop the photo (JPG, PNG, WebP, HEIC and more). The first time, the app downloads the AI models and shows the progress.
- Wait for the face to be found: the photo appears already framed in the 3x4 format, with the face at document size.
- Turn on the “Guides” to see the face outline and the eye line over the photo.
- If you need to, drag the photo, click it and use the mouse wheel (or two fingers on a phone) to zoom in on the face, or use “Face size”, “Vertical position” and “Horizontal position”.
- Leave “Straighten the head” on to correct the tilt. The “Reframe” button goes back to the automatic framing at any time.
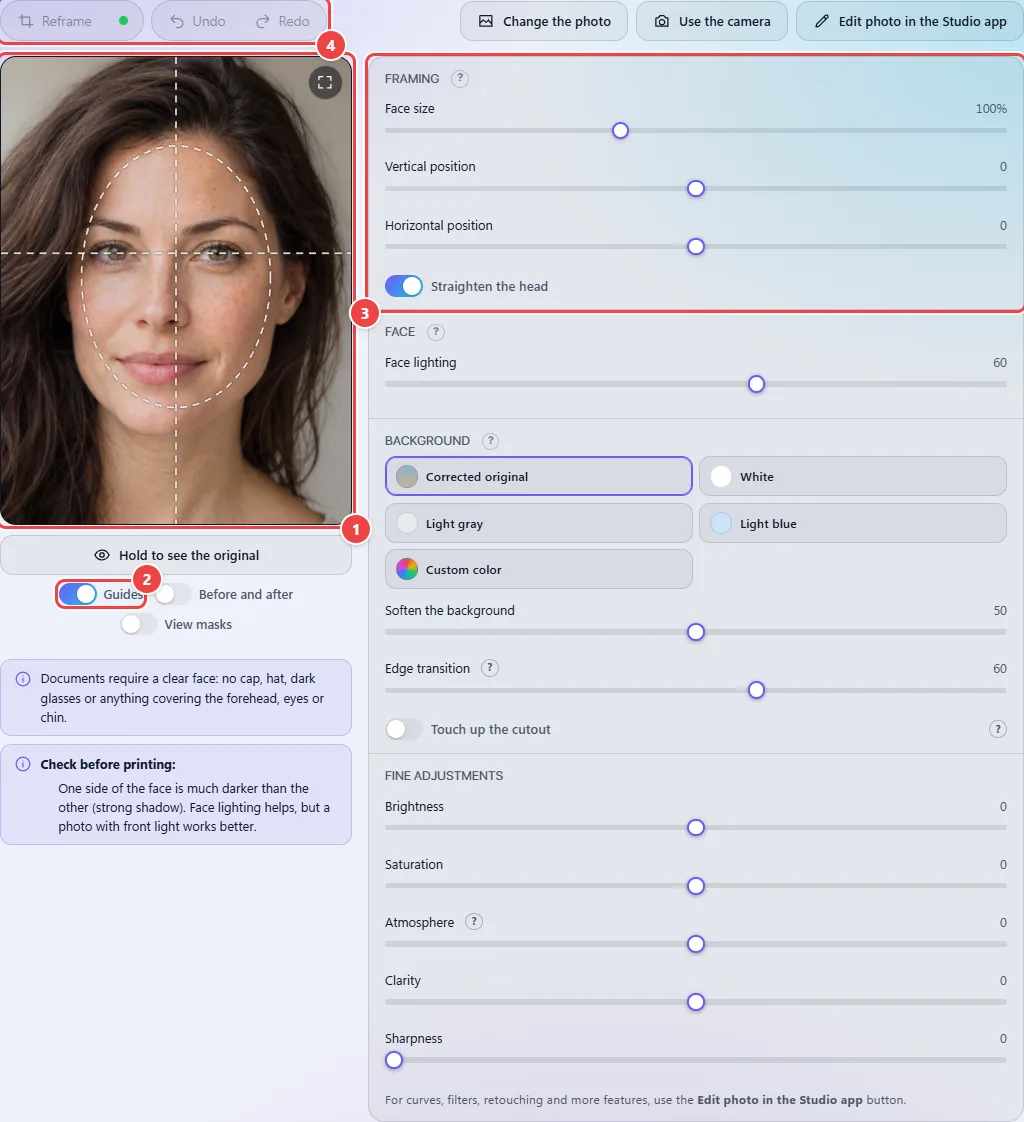
- Point 1: The photo already comes framed in the 3x4 format, with the face at document size and the eyes at the right height. Drag the photo to move it; click it and use the mouse wheel (or two fingers on a phone) to zoom in on the face.
- Point 2: Guides: show the face outline and the eye line over the photo, so you can check the framing.
- Point 3: Face size, vertical and horizontal position and Straighten the head. Double-click a control to return to its initial value.
- Point 4: Reframe goes back to the automatic framing. The AI is ready when the circle turns green.
Result: A 3x4 photo with the face at the right size and position for a document.
Replace the background with white
Situation: The document asks for a white background, but your photo was taken in the living room.
- In the “Background” section, choose “White” (or “Light gray”, “Light blue” or “Custom color”).
- Look at the edge of the hair. If it looks hard, raise the “Edge transition”; if a halo appears, lower it.
- Turn on “View masks” (below the photo) to check: red is the background and green is the face.
- If the AI got the outline wrong, turn on “Touch up the cutout” and paint over the photo: “Include in the person” gives back what was cut and “Remove from the person” sends what was left over back to the background.
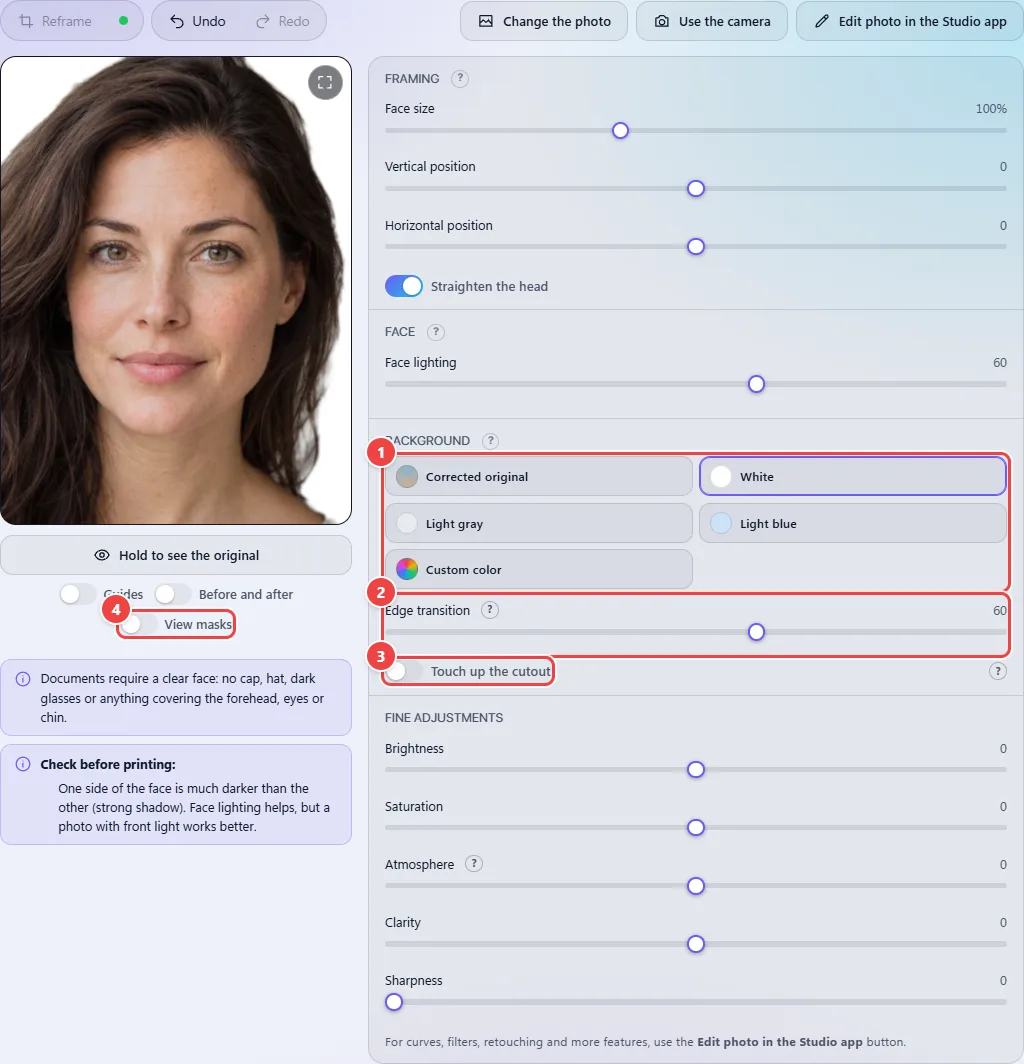
- Point 1: Choose the background: Corrected original (the photo’s own background, lighter and more even), White, Light gray, Light blue or Custom color.
- Point 2: Edge transition: low keeps the edge firm; high makes it softer and hides flaws in the hair.
- Point 3: Touch up the cutout: if the AI got the outline wrong, paint over the photo to include or remove pieces of the person.
- Point 4: View masks: shows the background in red and the face in green, so you can check the cutout.
Result: The person on a plain background, with the hair edge looking natural.
Fix the face light and compare with the original
Situation: The photo came out with one side of the face darker and you want to know whether the fix helped.
- In the “Face” section, adjust the “Face lighting”: it lifts what is dark and balances the two sides.
- Turn on “Before and after” and drag the middle handle to compare the result with your original photo.
- Or hold the “Hold to see the original” button to see the photo as it came.
- Under “Fine adjustments”, make small corrections to brightness, saturation, atmosphere, clarity and sharpness.
- Read the warnings below the photo (“Check before printing”): they say whether there is strong shadow, closed eyes, an out-of-focus face or low resolution.
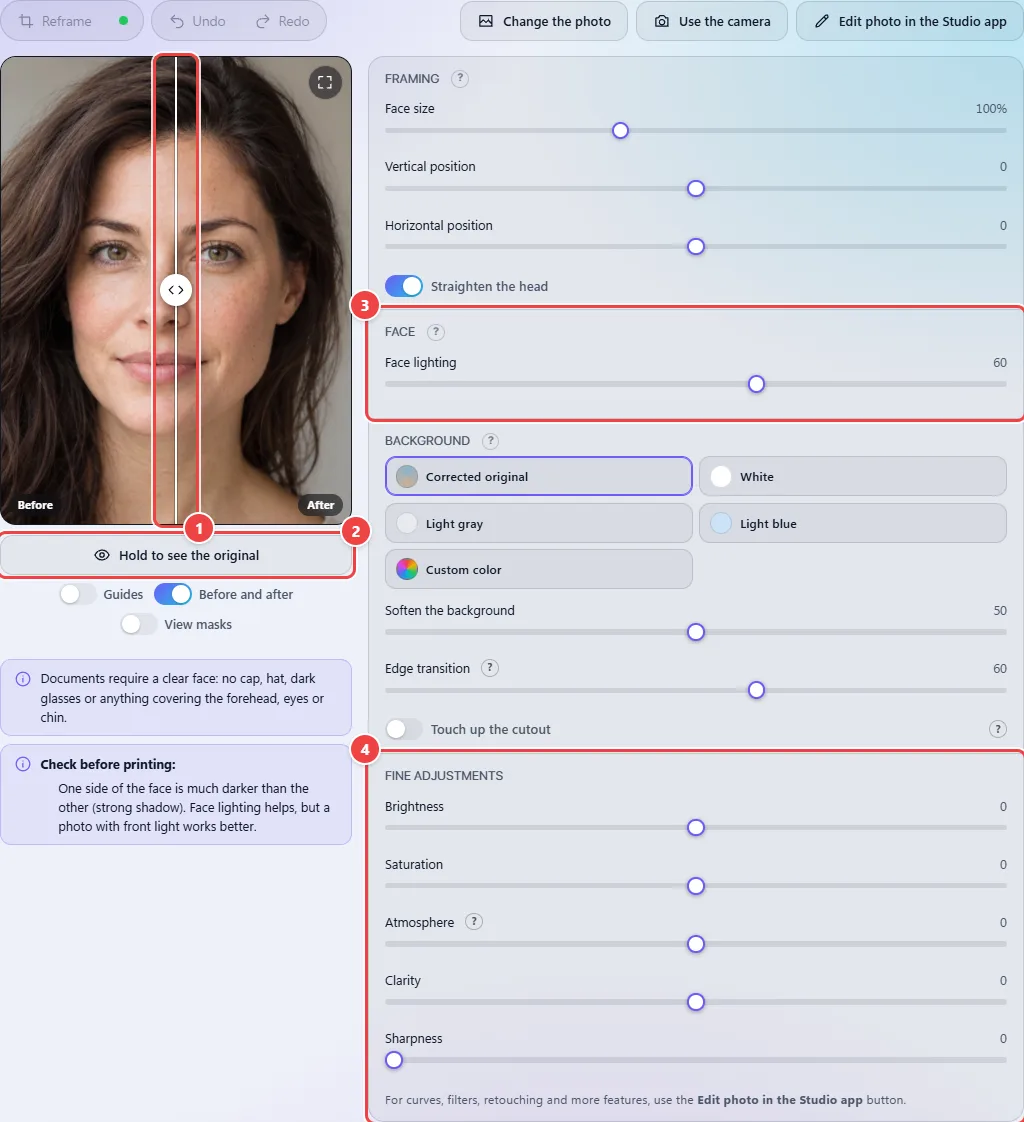
- Point 1: Before and after: drag the handle to compare your original photo (left) with the result (right).
- Point 2: Hold this button to see the original photo in place of the result.
- Point 3: Face lighting: lifts what is dark, holds back what is blown out and balances the light between the two sides of the face.
- Point 4: Fine adjustments: brightness, saturation, atmosphere, clarity and sharpness. For curves and filters, use the button that opens the photo in Studio.
Result: A photo with even light on the face and the certainty that it is better than the original.
Download the photo and build the print sheet
Situation: You want to print at home, or take to a shop, a sheet with several 3x4 photos.
- Under “Download”, choose the resolution (300 dpi or 600 dpi) and click “Download the photo (JPG)”. The “PDF (A4)” button makes an A4 sheet with the photo at real size (3 × 4 cm).
- Under “Print sheet”, choose the paper (10 × 15 cm or A4) and see the preview of where each photo will sit.
- Adjust the “Sheet margin” (if your printer cuts off the edges, increase it) and the “Space between photos”, and turn the “Cut lines” on or off.
- Choose how many copies of the photo go on the sheet. For photos of different people, tap + next to the quantity, then “Change the photo” and repeat.
- Click “Download the sheet” (JPG) or “PDF” and print at 100% scale, without “fit to page”.
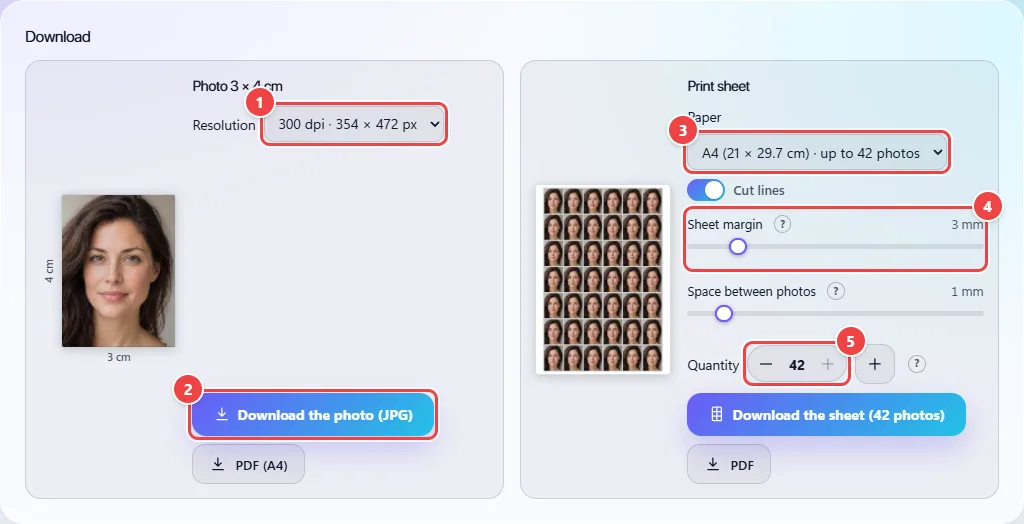
- Point 1: Resolution: 300 dpi (354 × 472 px) or 600 dpi (709 × 945 px). The file already comes out with the resolution recorded, so it prints at 3 × 4 cm.
- Point 2: Download the photo as a JPG. The button next to it makes an A4 PDF with the photo at real size (3 × 4 cm), to print without scaling.
- Point 3: Sheet paper: 10 × 15 cm or A4. The preview shows where each photo will sit.
- Point 4: Sheet margin and space between photos: if your printer cuts off the edges, increase the margin; the number of photos that fit changes with it.
- Point 5: How many copies of this photo go on the sheet. For photos of different people, tap + next to it, keep the photo on the sheet and change the photo.
Result: A finished sheet, with the photos at the exact size of 3 × 4 cm, to print at home or in a shop.
Take the photo on the spot, with the camera
Situation: You do not have a ready photo and want to take one now, facing the camera, in good light.
- Click “Use the camera”. On a secure page (https), the browser asks for permission and opens a window with an outline to place your face; otherwise, the button opens your phone’s camera app.
- Face the camera with your face inside the outline, good light on your face and a light, plain background behind you.
- Click “Take the photo” or “Photo in 3 seconds”, to have time to get into position.
- The photo goes straight to the framing. If you do not like it, click “Change the photo” and take another.
Result: A freshly taken photo, already framed in 3x4, without going through any server.
Tips for a better result
- For a good result, use a front-facing photo, with the whole face in view, eyes open and a neutral expression, with no cap, dark glasses or hair covering the forehead and eyes.
- Front light, from a window, improves the photo more than any adjustment. Avoid light from one side only: it creates the strong shadow the app warns about.
- Before printing, open the print dialog and choose 100% scale (“actual size”). “Fit to page” changes the size and the photo no longer measures 3 × 4 cm.
- Use “View masks” to check the background cutout before downloading, especially with voluminous hair or clothes similar to the background.
- To put another person on the same sheet, use the + button next to the quantity to keep the photo and then “Change the photo”.
Limits, and when this is not the best option
- The app does not know which document you will make: each one has its own rules for background, face size and expression. Check your document’s requirements.
- The format is only 3 × 4 cm (with 10 × 15 cm and A4 sheets), the Brazilian standard. For documents that ask for other sizes, such as 2 × 2 inches or 35 × 45 mm, this is not the best choice.
- Separating the person from the background is done by AI and can get it wrong with very voluminous hair, glasses or backgrounds similar to the clothes; use “View masks” and “Touch up the cutout”.
- It works best with a single face and the whole head in view. In a group photo, the app frames one face only.
- For heavier retouching (curves, filters, object removal), open the photo in Studio with the “Edit photo in the Studio app” button.
Frequently asked questions
- Is my photo sent to a server?
- No. The photo is opened and edited on your device. What is downloaded, once, are the public Google AI models (about 8 MB), checked with SHA-256 and stored in the browser. You can check it in Network (F12): no photo leaves.
- Do I need to create an account or pay?
- No. It is free and needs no sign-up.
- What is the size of a 3x4 photo?
- 3 cm wide by 4 cm tall. At 300 dpi that is 354 × 472 pixels; at 600 dpi, 709 × 945 pixels. The file already comes out with the resolution recorded, so it prints at the right size.
- How many photos fit on the sheet?
- With a 3 mm margin and 1 mm between the photos, nine fit on 10 × 15 cm paper and up to forty-two on A4. You can change the margin and the space between the photos, and the number of photos that fit changes with them.
- Can I replace the background with white?
- Yes. In the “Background” section, choose White, Light gray, Light blue or Custom color. With “Corrected original”, the background is kept but gets lighter and more even.
- Why does the app say the face is out of focus or the photo has low resolution?
- These are quality warnings for you to fix before printing: the app measures the sharpness of the face and the real size of the crop in the original photo. Use a sharper photo, or the original at higher resolution, instead of a version shrunk by a messaging app.
- Does it work with iPhone photos (HEIC)?
- Yes. The app opens HEIC, HEIF, JPG, PNG, WebP, TIFF, AVIF and PSD.