Edit your photos like a pro
Free photo editor, right in the browser: adjust light, color and curves, apply filters, crop and straighten, and copy the edit to dozens of photos in a folder. Nothing to install and no photo is uploaded.
Drop your photos here
or open a whole folder to review and edit photo by photo, with the filmstrip of thumbnails below.
Example: Forest at sunrise, by Peter Heeling (CC0, public domain)
- JPEG
- PNG
- WEBP
- AVIF
- HEIC
- TIFF
- PSD
- GIF
- BMP
Everything happens on your device: photos are not sent to any server.
About Studio
Edits photos in the browser, with light, color, curves, local masks, crop, filters and black and white. It opens a whole folder with a filmstrip of thumbnails and copies the edit of one photo to many others. Your photos never leave your device.
What makes Studio different
It brings together, in one place, reviewing the photos of a folder and the editing adjustments. What it does:
Folder and filmstrip
Open a folder and go through the photos; each one remembers the edit you made, even after you close the page.
Copy and paste the edit
Take the adjustments of one photo to others, choosing what to copy. The crop does not go along by default.
Curves, color and black and white
Light, color, texture, clarity, dehaze, curves per channel, an eight-color mix, grading and black and white with control of each color.
Masks and AI selections
Radial, gradient and brush masks, a light and color range, and automatic selection of the sky, the person, the hair and the skin, each with its own adjustments.
Filters and My styles
Ready-made filters in collections and the option to save your edit as a style, or to match the light and color of another photo.
Camera data kept
In the exported JPG, date, camera, lens and color profile go along with the file, and the original’s embedded thumbnail is erased.
How to use it
- Choose the photos or open a folder (you can also drop the files on the page).
- Go through the photos with the keyboard arrows or the filmstrip and adjust the current photo in the Basic, Curves, Color, Effects, Masks, Crop and Filters tabs.
- To repeat the edit, click Copy, select the other photos in the filmstrip and click Paste (or use Sync).
- Click Export, choose format, quality and size, and download one photo, a ZIP, or save to a subfolder.
Limits and cautions
- It does not remove objects or clone areas yet.
- RAW photos (DNG, CR2, NEF, ARW…) are not opened yet. It reads JPG, PNG, WebP, AVIF, HEIC, TIFF, PSD, GIF and BMP; it exports JPG, PNG, WebP, AVIF and PDF.
- Date, camera, lens and color profile only travel with a JPG made from a JPG; location (GPS) goes along if it exists, and you can uncheck the option.
- The preview uses up to 2560 pixels on the longest side; the export is redone at the original size. On iPhone and iPad the limit is about 16 megapixels.
- The AI selections (person, hair, eyes and teeth) need the AI models, downloaded once in the background. Without them, the sky and skin selections and the manual masks still work.
- Edits stay only in this browser. To take them to another device, use Save edits (a .wfstudio file, with the adjustments only).
The tool in one image
The click points are numbered. Tap the image to see it at full size. The other screens, step by step, are in the “How it works” guide.
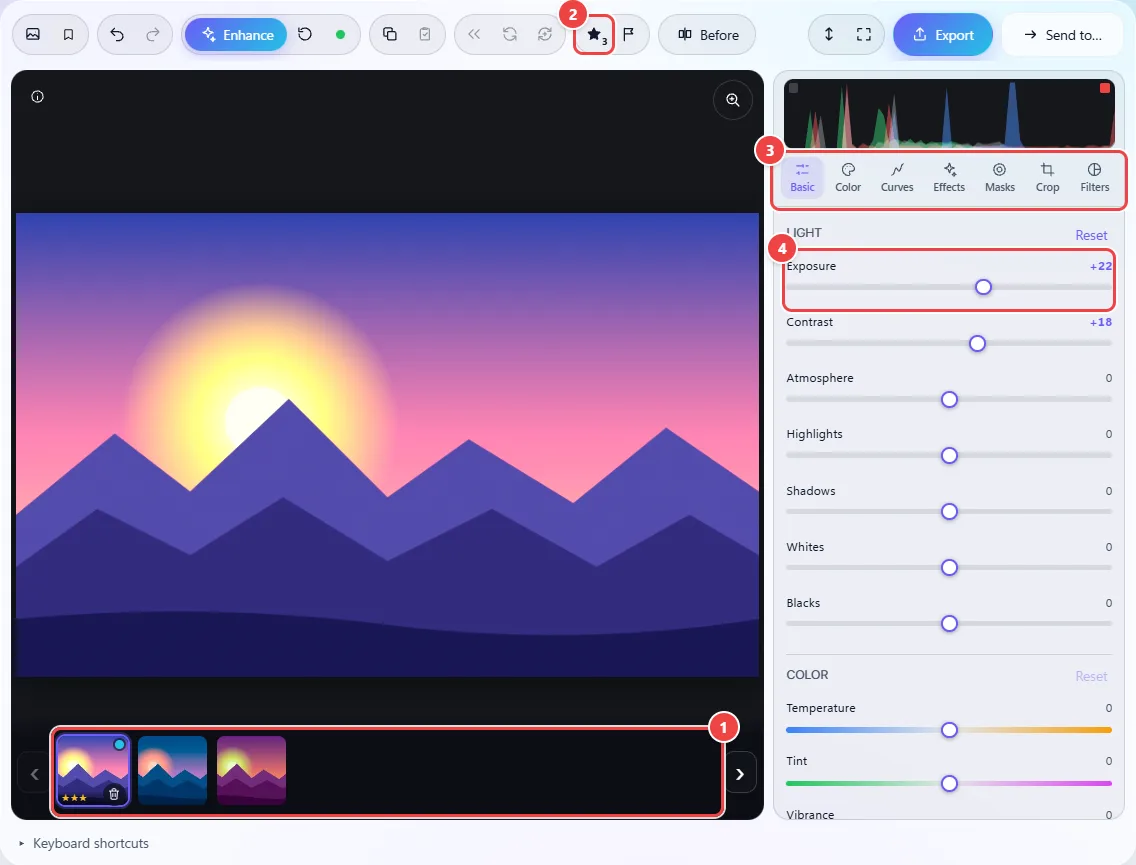
- Point 1: The filmstrip shows the open photos. Click a thumbnail or use ← and → on the keyboard; the colored dot marks the ones already edited.
- Point 2: The rating goes from 0 to 5 (keys 0–5). P marks as picked and X as rejected.
- Point 3: The tabs gather the adjustments: Basic, Color, Curves, Effects, Masks, Crop and Filters.
- Point 4: Drag the control to adjust the current photo. Double-clicking the name goes back to default.
Read the full guide: real-world use cases, tips and limits →
Privacy: Studio runs entirely in your browser and no photo is sent to a server. In the background (and only if you do not turn it off), it downloads Google AI models once — MediaPipe, about 8 MB, served from jsDelivr and Google Cloud Storage — to find the face, eyes, teeth, person and hair more precisely. Only those files are downloaded; each one is checked with SHA-256 and stored in the browser. You can turn it off at any time with the “AI” button. Learn more.
Frequently asked questions
- Are my photos sent to a server?
- No. They are opened and edited on your device, and the edit is drawn by its graphics card. You can check it in Network (F12): no photo leaves. The only download is the Google AI models (about 8 MB, once), which you can turn off.
- Is the original file changed?
- No. The edit is a recipe of adjustments kept separately; only the export creates a new file, with a name ending in “-studio”.
- How do I copy the edit to many photos?
- Click Copy on the edited photo and choose what to take (the crop comes unchecked). Select the others in the filmstrip with Ctrl or ⌘ + click, or Shift + click for a range, and click Paste.
- What are masks for?
- A mask limits an adjustment to part of the photo: a radial or gradient mask, a brush, a range of light and color, or an automatic selection of the sky, the person, the hair or the skin. Each mask has its own adjustments and can be refined and inverted.
- Does it work on a phone?
- Yes. On a phone, swiping one finger on the photo switches the adjustment (vertical) and changes the value (horizontal); pinching zooms.
- Can I open iPhone HEIC photos?
- Yes. HEIC, TIFF, AVIF and PSD are read by the same engine as the site’s image converter. When exporting, you choose the format (JPG by default).