How to edit photos in the browser and copy the edit to many photos
Adjusting the light and color of one photo is easy; the hard part is repeating the same fix on 80 photos from the same event. This guide shows how to open a folder, edit with curves, masks, filters and crop, and copy the edit from one photo to the others, all in the browser, on a computer or a phone.
Guide written by Marcelo Amantino · updated on November 5, 2026 · about us
Where your data is processed
Your browser reads the photos and the edit is drawn by the graphics card of your own device: nothing is sent to WebFaz. Your edits are kept only in this browser, as a recipe of adjustments (not as a copy of the photo), and the original file is never changed. In practice this matters for family, work and event photos, which you do not need to hand to an unknown service just to brighten a sky.
See the full list on the Privacy page.
Real-world use cases
Review and edit the photos in a folder
Situation: You came back from a trip with 120 photos and want to go through all of them, adjusting the ones that need it.
- Open Studio and click “Open folder” (or drop the photos on the page).
- Go through the photos with the ← and → keyboard arrows or by tapping the filmstrip below.
- Rate from 0 to 5 with the number keys, mark the best ones with P and the poor ones with X.
- In the “Basic” tab, adjust the exposure, contrast, highlights and shadows of the current photo.
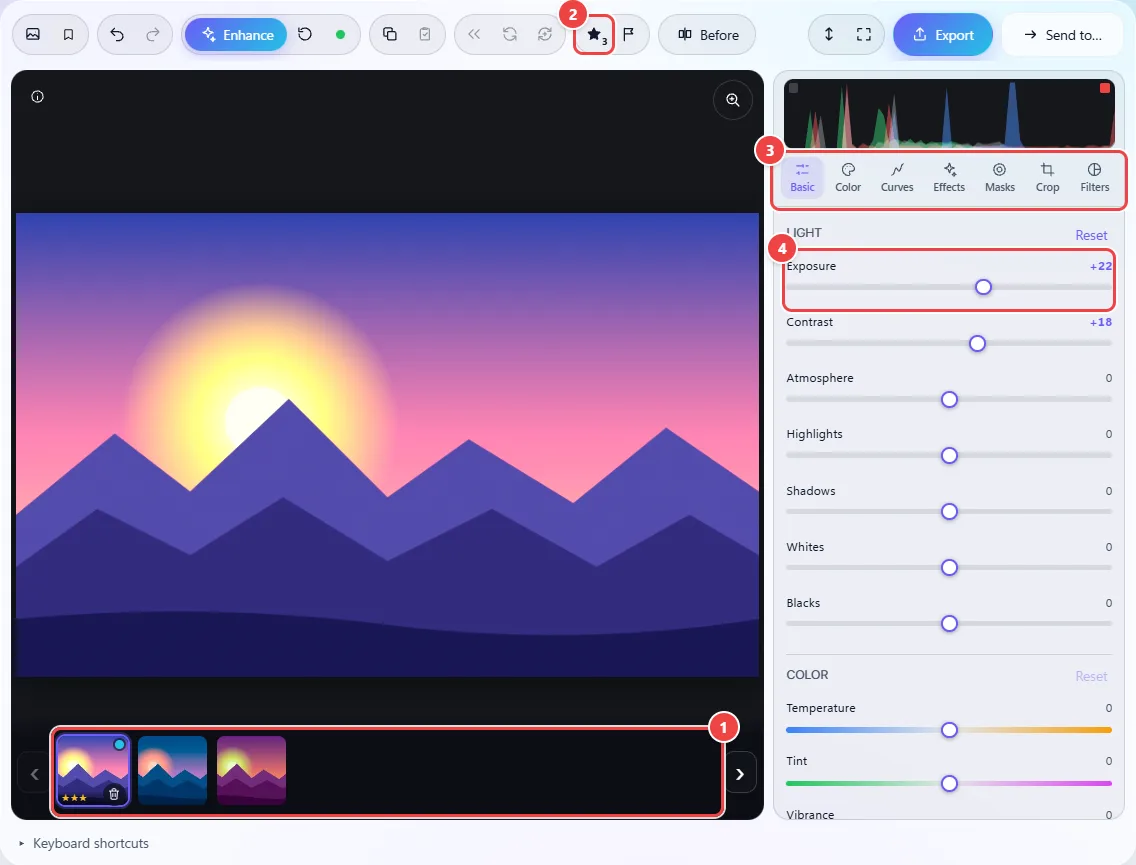
- Point 1: The filmstrip shows the open photos. Click a thumbnail or use ← and → on the keyboard; the colored dot marks the ones already edited.
- Point 2: The rating goes from 0 to 5 (keys 0–5). P marks as picked and X as rejected.
- Point 3: The tabs gather the adjustments: Basic, Color, Curves, Effects, Masks, Crop and Filters.
- Point 4: Drag the control to adjust the current photo. Double-clicking the name goes back to default.
Result: Each photo with its edit saved, and a small dot in the filmstrip showing which ones have already been edited.
Copy the edit of one photo to the others from the event
Situation: You got the light right on one party photo and want the same adjustment on the other 40 taken in the same place.
- Edit the model photo until it looks good.
- Click “Copy”, check what to take (the crop and masks come unchecked) and confirm.
- In the filmstrip, select the other photos: Ctrl (or ⌘) + click adds them one by one and Shift + click picks a range.
- Click “Paste”.
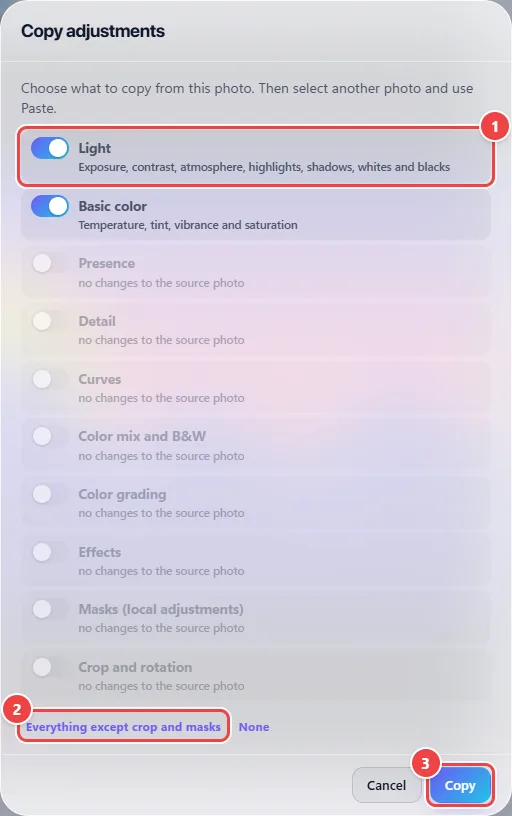
- Point 1: Each group is a family of adjustments. Only the ones you actually changed on this photo can be checked.
- Point 2: Checks all the edited groups, except the crop, the rotation and the masks, which belong to each photo.
- Point 3: After copying, select the other photos in the filmstrip (Ctrl or ⌘ + click) and use Paste.
Result: The selected photos get the same adjustments, each keeping its own crop. Ctrl+Z undoes it on one photo at a time.
Straighten the horizon and crop for Instagram
Situation: The beach photo came out tilted and you need it in 4:5 for the feed.
- Open the “Crop” tab.
- In the “Straighten” tool, move the control until the horizon is level (or tap AUTO): the frame adjusts itself so no empty corner is left.
- In the proportion tool, choose “4:5” (clicking the same button again switches to 5:4).
- Drag the frame to compose and go back to another tab to see the result.
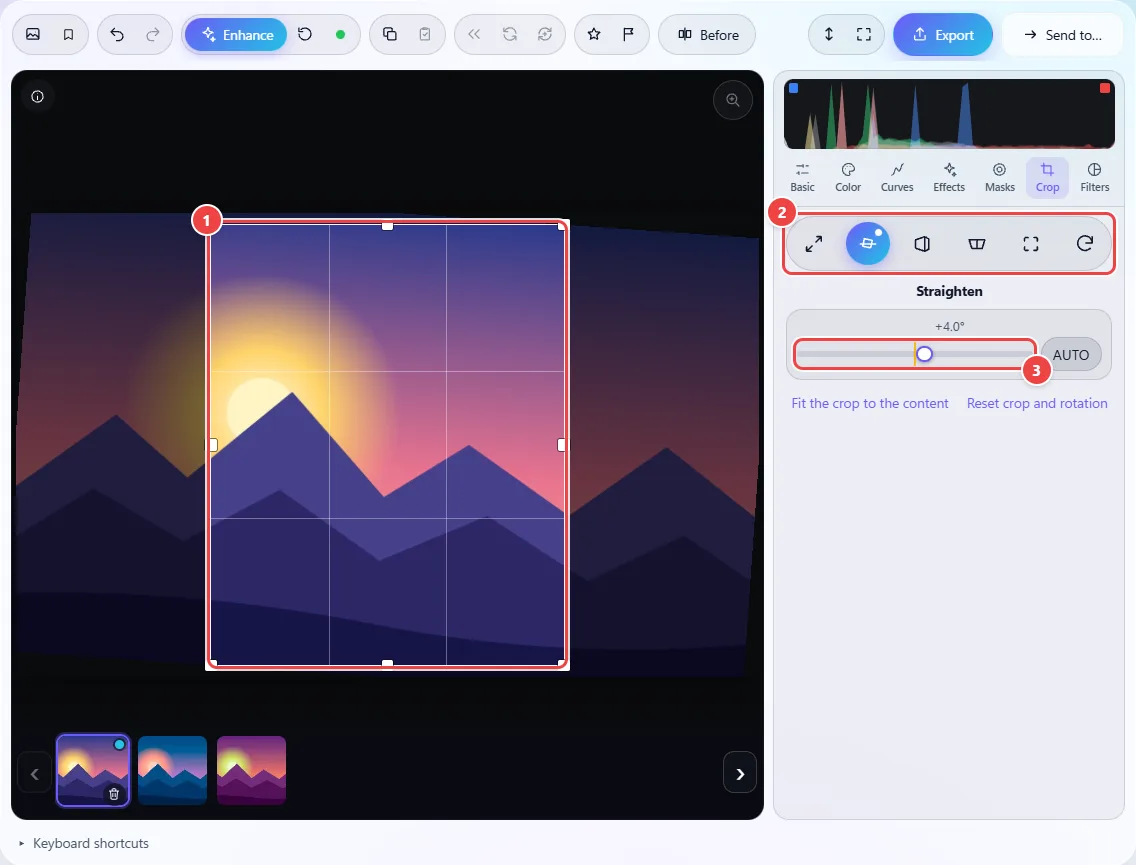
- Point 1: Drag the frame to compose and the handles to resize. The proportion stays locked.
- Point 2: Choose the tool: proportion (clicking the same button again switches to the inverse orientation, 5:4), straighten, perspective, and rotate and flip.
- Point 3: Straighten turns the photo from -45° to 45°; the frame adjusts so no empty corner is left.
Result: The photo straight and cropped in the right proportion, without losing the original: you can go back to a free crop whenever you want.
Brighten only the sky or the person
Situation: The sky is washed out but the person in the foreground is well exposed, and you do not want to change the whole photo.
- Open the “Masks” tab and choose “Sky” (or “Person and subject”, to adjust the person).
- Turn on “Show mask in red” to see the area the mask picks up. If a piece is missing, increase the Range; if it picks up too much, decrease it.
- Adjust the highlights, clarity and color of that mask only. Use “Invert mask” to adjust everything except that area.
- To let the app do it, use the “Automatic improvement”, which treats the person, the background and the sky separately.
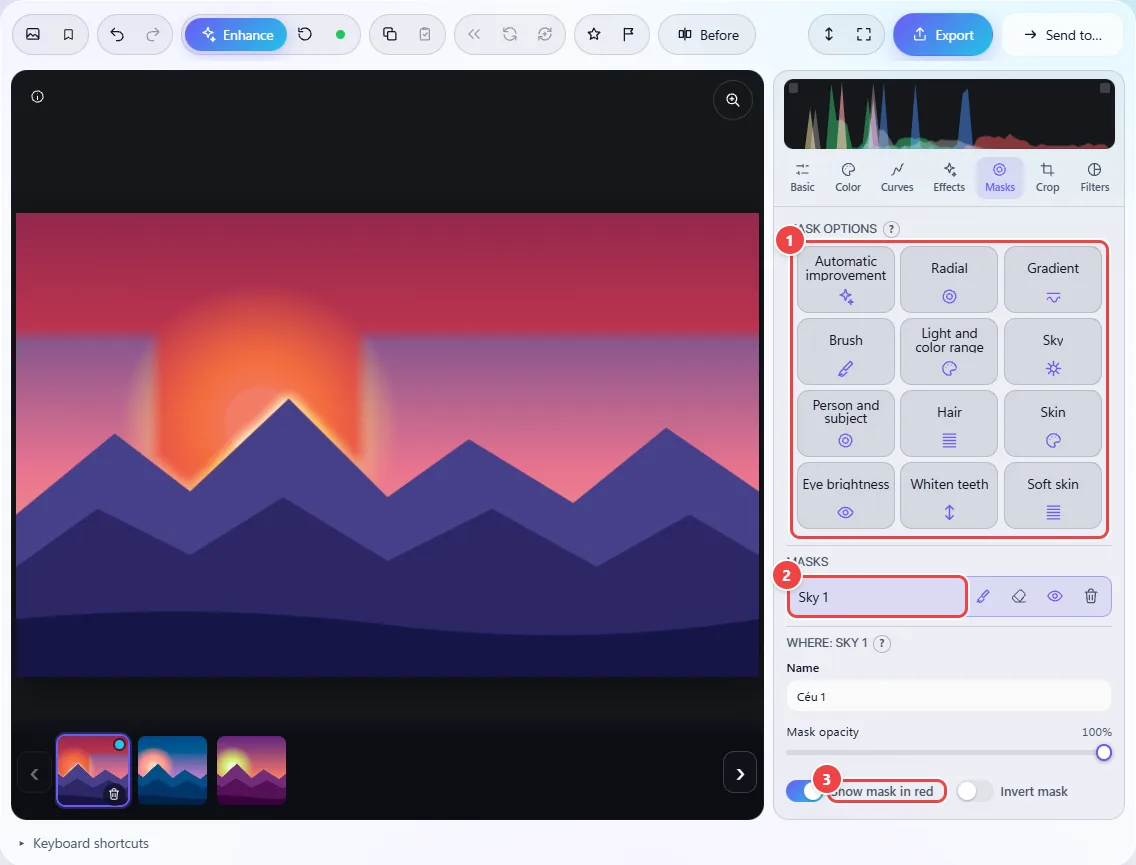
- Point 1: Choose the type of mask: radial, gradient, brush, light and color range or an automatic selection (sky, person, hair, skin).
- Point 2: Each mask appears in the list, with buttons for brush, eraser, on and off, and delete.
- Point 3: Shows in red the area the mask picks up. If a piece is missing, increase the Range; if it picks up too much, decrease it.
Result: Each part of the photo with its own light and color, and every mask still editable.
Give it a cinema look or black and white
Situation: You want a different mood for a landscape or street photo.
- Open the “Filters” tab and tap a filter (Cinema, Vintage, Noir…): the thumbnails already show how your photo would look.
- Adjust whatever you want on top, in the “Basic”, “Curves” and “Color” tabs.
- In the “Color” tab, turn on “Black and white” and use the controls of each color to lighten the blue sky or darken the skin.
- In “Filters > My styles”, give it a name and save the edit to use again.
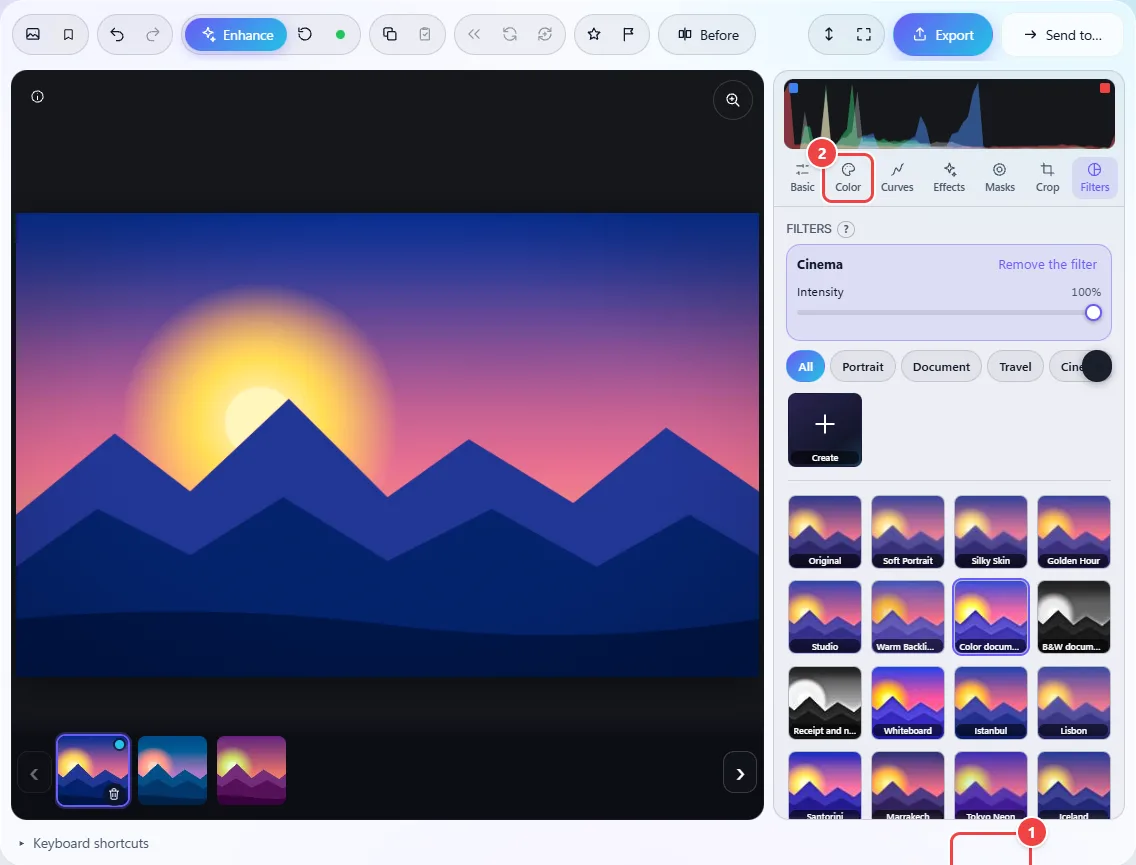
- Point 1: Each thumbnail shows your photo with that filter. One tap applies, and you keep adjusting on top.
- Point 2: In the Color tab are black and white, with control of each color, and the grading of shadows and highlights.
Result: A complete look applied with one tap, adjustable and saved as your own style.
Export in batch, without losing the camera data
Situation: You edited 30 photos and need to deliver them as JPG, in a smaller size.
- Select the photos in the filmstrip (or choose “All”).
- Click “Export”, choose JPG, the quality and the size of the longest side.
- Leave “Keep camera data and color profile” checked if you want the date, camera and lens in the files.
- If you opened a folder through Chrome or Edge, check “Save in a Studio subfolder”; otherwise, download a ZIP.
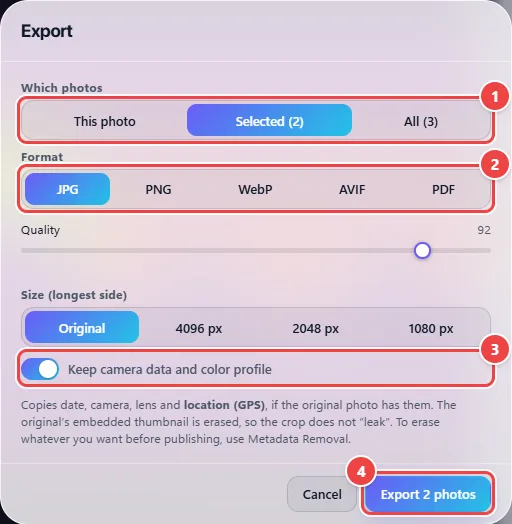
- Point 1: Export only this photo, the ones selected in the filmstrip (Shift or Ctrl + click) or all of them.
- Point 2: JPG, PNG, WebP, AVIF or PDF. With JPG you control the quality right below.
- Point 3: Keeps the original’s date, camera, lens and color profile (and the location, if any). Uncheck it to carry nothing.
- Point 4: Several photos come out in a ZIP, or in a “Studio” subfolder if you opened the folder through Chrome or Edge.
Result: The edited files, as JPG, in the “Studio” subfolder or in a ZIP, with the original photos untouched.
Tips for a better result
- Double-clicking the name of an adjustment (or its value) goes back to default; “Reset” clears a whole group.
- Hold the “Before” button (or the \ key) to compare with the original photo.
- Zoom with the mouse wheel or by pinching to check sharpness; double-click switches between fit and zoom.
- If you are going to publish the photo and do not want the location, uncheck “Keep camera data” when exporting, or run the file through Metadata Removal.
- Save the edits in a .wfstudio file to take them to another device: it keeps only the adjustments, not the photos.
Limits, and when this is not the best option
- It does not remove objects or clone areas yet.
- RAW photos (DNG, CR2, NEF, ARW…) are not opened yet: Studio reads JPG, PNG, WebP, AVIF, HEIC, TIFF, PSD, GIF and BMP.
- Camera data only travels with a JPG made from another JPG. PNG, WebP and AVIF come out without it, and HEIC photos do not carry the data into the JPG.
- The preview uses up to 2560 pixels on the longest side; the export redoes everything at the original size. On iPhone and iPad the browser limit is about 16 megapixels, and the photo comes out smaller if it goes over that (the app warns you).
- Each exported JPG gets a “Processed by WebFaz.com” comment, like the other files made on the site.
- Studio works in sRGB. Photos in wider color spaces (such as Display P3) are converted.
Frequently asked questions
- Are my photos sent to a server?
- No. The photos are opened and edited on your device. The only traffic from the site is the usual one (statistics and ads), which does not carry your photos. The AI models (about 8 MB, once) are the only thing downloaded for the editor. You can check it in your browser’s Network tab (F12).
- Do I need to create an account or pay?
- No. It is free and needs no sign-up.
- Does my edit change the original file?
- No. The original stays as it is; the edit is kept as a recipe of adjustments and only becomes a new file when you export, with a name ending in “-studio”.
- Where are my edits if I close the page?
- In this browser, tied to the name, size and date of each photo. When you open the same folder again, the edits come back. If you clear the browser data, they are gone: use “Save edits” to keep a .wfstudio file.
- Does it work with a whole folder on a phone?
- A phone opens photos chosen from the gallery and edits them normally. Opening a folder through the browser exists in Chrome and Edge on a computer; in the others, the button uses the ordinary folder picker, read-only, and the export comes out as a ZIP.
- Can I use the edit of one photo on another of a different size?
- Yes. The light, color and effects adjustments do not depend on the size. The crop and rotation are not pasted by default, precisely because each photo has its own framing.